Redis stream은 데이터가 계속 추가되는 logging같은 사용 케이스를 염두해 두고 도입었다고 한다. 하지만 stream 내에 쌓여 있는 아이템 들 중 ACK를 받지 못한 아이템들을 PEL(Pending Entries List)로 관리 할 수 있다 보니 처리 내역을 파악하거나 중복된 처리를 막는데에도 유용하게 사용될 수 있다.
Redis는 다양한 프로그래밍 언어 API를 지원하지만 이 포스팅에서는 각 명령어들의 활용에 중점을 두어 명령어 인터페이스(CLI)를 알아보고 task queue를 생성하고 처리하는 과정을 bash script로 구성해 본다.
Task Queue
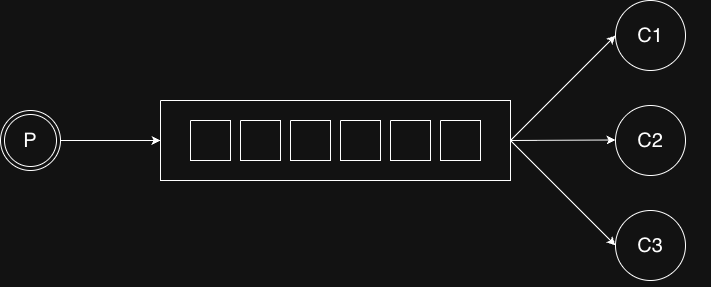
Task 실행요청이 queue를 통해 들어와서 여러개의 consumer들이 이 내용을 읽어서 처리하는 상황을 가정해 보자. 다음의 그림에서 ‘P’는 생산자(Producer)로 task를 queue에 넣어주고, ‘C1’, ‘C2’, ‘C3’는 소비자들(Customers)로 task queue에서 item(task)를 꺼내서 처리한다.
Redis로 이를 구현하기 위해서는 크게 두개의 동작이 필요 한데, 하나는 READGROUP으로 task를 읽어 들이는 것이고, 다른 하나는 처리가 완료 되었다는 것을 ACK로 Redis에 알려 주는 것이다. 이 응답을 받으면 해당 task는 queue에서 제거된다.
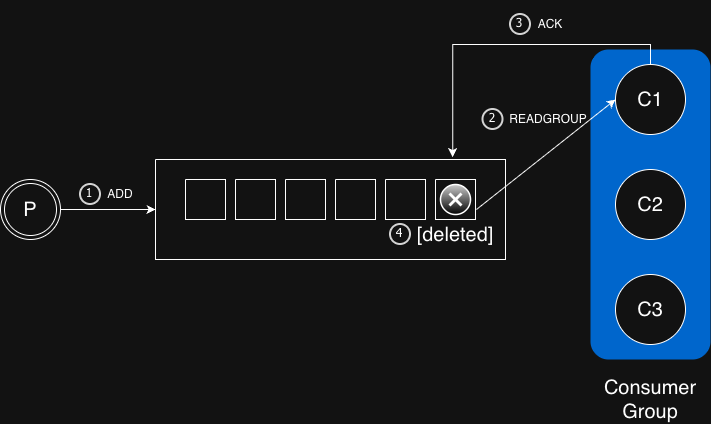
순서대로 살펴보면, 먼저 ① Producer가 task를 queue에 추가한다. ② Consumer들이 READGROUP명령으로 task를 가져 가서 처리한다. ③ 처리가 완료되면 해당 consumer는 ACK를 보낸다. ④ ACK 전송을 받은 task는 queue에서 제거된다.
참고로 실제 Redis의 stream관련명령어 앞에는 ‘X’ prefix가 붙는다.
redis-cli를 이용한 실습
redis-cli는 다양한 운영체제에서 사용할수 있는 명령어 인터페이스로 프로그래밍 API없이도 Redis명령어를 수행할 수 있도록 해준다.
그룹만들기
앞으로 사용할 Redis stream을 taskq 라고 이름 짓고 이것에 접근하는 그룹명을 consumers 라고 부르도록 하자. 다음의 명령어는 Redis stream과 여기에 접근할 그룹을 생성해준다.
redis-cli XGROUP CREATE taskq consumers 0 MKSTREAM
① Queue에 추가하기
XADD 명령어를 이용해서 taskq stream에 task_id로 시작하는 메세지를 다음과 같이 추가한다. "*" 표시는 item의 identifier를 따로 지정하지 않고 자동할당 하도록 하겠다는 의미이다. Identifier는 숫자로된 timestamp 형식이 아니면 받아들여지지 않으니 수동으로 지정해 줄 것이라면 형식에 주의해야 한다.
XADD taskq "*" task_id task_1 data "1번째로 넣은 태스크"
XADD taskq "*" task_id task_2 data "2번째로 넣은 태스크"
XADD taskq "*" task_id task_3 data "3번째로 넣은 태스크"
...
② Task 처리(consume)
XREADGROUP 명령어로 taskq로 부터 아이템을 하나 읽는다. BLOCK 구문 뒤의 숫자는 아이템이 없을 때 얼마나 기다릴 것인가를 밀리초 단위로 나타내는 것이다. 그리고 명령어 마지막에 붙는 ">"가 이 명령어에서 중요한 역할을 하는데, 이것 때문에 다른 consumers 멤버가 가져가지 않은 task가 반환된다. 만약 모두 가져가서 queue가 비어 있다면 BLOCK에 설정된 10초(10000ms)를 기다렸다가 종료한다.
XREADGROUP GROUP consumers c1 COUNT 1 BLOCK 10000 STREAMS taskq ">"
③ ACK 전송
처리가 완료된 아이템을 표시하기 위해 XACK 명령어로 해당 message id를 전송하면 해당 task는 queue에서 삭제된다. 위의 명령어에서 message id를 자동 생성하도록 설정해 두었기 때문에 이 떄 반환되는 id값을 기억해 두었다가 파라미터로 넘겨주어야 한다.
XACK taskq consumers <message_id>
Bash script
위의 과정들을 bash script로 작성하면 다음과 같다.
현재 처리 상태 표시
PEL(Pending Entries List) – XPENDING
아직 XACK를 받지 않는 아이템도 일단 어느 한 consumer가 처리하려고 queue에서 가져가면 다른 consumer들의 요청에 의해 중복 반환되지 않는 것이 보장되는데, 이 덕분에 동일한 아이템이 중복해서 처리되는 것을 막을 수 있다. 아직 처리가 완료되지 않는 목록들은 Redis가 PEL(Pending Entreis List)로 따로 관리하며 XPENDING 명령어로 그 상태를 확인해 볼 수 있다.
redis-cli XPENDING taskq consumers - + 10
1) 1) "1782541916776-0"
   2) "c1"
   3) (integer) 3541627
   4) (integer) 1
XINFO
XINFO를 이용하면 특정 stream의 현재상태를 확인할 수 있다. 예를 들어 10개의 task를 생성해서 3개만 처리한 후 XINFO 명령어로 taskq의 상태를 보면 다음과 같이 보여준다.
redis-cli XINFO GROUPS taskq
1)  1) "name"
    2) "consumers"
    3) "consumers"
    4) (integer) 3
    5) "pending"
    6) (integer) 0
    7) "last-delivered-id"
    8) "1782439931183-0"
    9) "entries-read"
   10) (integer) 3
   11) "lag"
   12) (integer) 7
출력이 좀 보기에 불편한데, 정리해 보면 다음과 같다.
# Group의 이름은 'consumers'임
name                consumers

# 3개의 'customers'가 지금까지 메세지를 읽어 갔음.
consumers           3

# ACK를 못받고 pending 중인 아이템은 없음.
pending             0

# 마지막으로 읽혀진 메세지의 아이디는1782439931183-0.
last-delivered-id   1782439931183-0

# 3개의 메세지가 읽혀졌음.
entries-read        3

# Stream안에는 아직 7개의 메세지가 남아 있음.
lag.                7