Android Studio는 내 PC에서 좀 느리긴 하지만, 다른 IDE들에 비해서는 Emacs key binding이 비교적 잘되어 있어서 만족 하면서 조금씩 배워가고 있다. NDK로 JNI에서 불러다 쓸 native code를 구현하다 보니 Googletest를 사용하기 위해 매번 device로 push 하고 실행하는 과정이 꽤나 번거로와서 script로 만들어 보았다. 이 글에서는 Android Studio에서 Googletest를 사용하기 위한 기본적인 설정과 device에 push하는 과정을 편하게 해주는 script에 대해 설명한다.
환경
Bash script를 사용할 것이므로 Linux 환경이나 Cygwin이 설치되어 있어야 한다. 사실 여기의 내용은 Windows + Cygwin에서 시험되었으나 Bash가 동작하는 환경이라면 특별히 문제는 없을 것이다.
Googletest
Google의 C++ testing framework인 Googletest는 Googletest GitHub에서도 받아서 사용할 수 있으나, NDK package안에도 들어 있다. 여기서는 NDK안의 다음 경로에 있는 Googletest를 사용하기로 한다. Native test case들을 작성할 공간을 app/src/main/jni 아래에 ‘tests’라는 이름으로 만들고 이곳으로 gogoletest를 복사해 온다.
$>mkdir ./app/src/main/jni/tests
$>cp -r $ANDROID_NDK_PATH/sources/third_party/googletest ./app/src/main/jni/tests/
Android.mk
기존에 사용하던 native용 Android.mk file에 Googletest를 사용하기 위한 추가 수정을 해준다.
#
# 1. 시험할 기능을 포함하는 라이브러리
#
LOCAL_PATH := $(call my-dir)
include $(CLEAR_VARS)

LOCAL_MODULE := 라이브러리_이름
LOCAL_SRC_FILES := 소스파일들

include $(BUILD_SHARED_LIBRARY)


#
# 2. Googletest static library
#
# Google test static library
include $(CLEAR_VARS)
GTEST_PATH := tests/googletest

LOCAL_MODULE := googletest_main
LOCAL_CFLAGS := -Ijni/tests/googletest/include -Ijni/tests/googletest/

LOCAL_SRC_FILES := \
    $(GTEST_PATH)/src/gtest-all.cc

include $(BUILD_STATIC_LIBRARY)


#
# 3. 작성된 test case 실행파일
#
include $(CLEAR_VARS)

LOCAL_MODULE := testcases
LOCAL_CFLAGS := -Ijni/tests/googletest/include -Ijni

LOCAL_SRC_FILES := \
    tests/Test_Main.cpp \
    tests/테스트케이스_소스파일들

LOCAL_SHARED_LIBRARIES := 라이브러리_이름
LOCAL_STATIC_LIBRARIES := googletest_main
include $(BUILD_EXECUTABLE)
위에서 첫 번째 항목 “라이브러리_이름“은 시험 대상이 되는 code를 포함하는 shared library file이고 두 번째 항목은 Googletest의 기능을 static library로 컴파일 하는 과정이다. 사실 googletest 디렉토리 안에는 이것 외에도 많은 소스파일들이 들어 있는데, 시험해 본 바로는 gtest-all.cc만으로도 동작에 문제가 없는것 같다.
이제 마지막으로 테스트 케이스들과 이 테스트 케이스들을 호출하는 Test_Main.cpp를 작성하고, 이 때 필요한 “라이브러리_이름”과 googletest_mian static 라이브러리를 링크시켜준다.
Test_Main.cpp는 예제에 있는것을 그대로 사용했는데 내용은 다음과 같다.
#include <stdio.h>

#include "gtest/gtest.h"

GTEST_API_ int main(int argc, char **argv) {
  printf("Running main() from gtest_main.cc\n");
  testing::InitGoogleTest(&argc, argv);
  return RUN_ALL_TESTS();
}
Gooletest에서 사용하는 테스트 케이스를 작성하는 방법들은 여러 곳에서 찾을 수 있으므로 여기에서는 설명하지 않는다.
runtest.sh
이제 빌드를 수행하면 동적 라이브러리인 lib라이브러리_이름.so와 testcases 파일이 만들어진다. 이것을 시험하려면 디바이스에 push한 다음 library 경로를 설정해주고 실행시켜서 결과를 봐야 하는데, 매번 시험할 때마다 이 과정을 반복하기는 매우 귀찮다. 여러개의 so file로 나눠서 작성한 경우라면 더욱 그렇다.
그래서 이 귀찮은 과정을 bash로 작성해 두고 Android Studio의 External Tools 기능을 이용해서 부를 수 있도록 설정한다. (단축키 까지 달아 두면 훨씬 편하겠지?)
우선, 귀찮은 일을 해주는 bash script는 다음과 같다. 실행파일 이름과 함께 사용할 라이브러리 파일의 목록을 인자로 받아서 디바이스에 push하고 라이브러리 path를 잡아서 실행시킨다.
#!/bin/bash
#
# This script pushes specified gtest related files into devices'
# /cache/xxx directory and runs it.
#

if [ "$#" -eq 0 ]; then
    echo "USAGE: ${0} exe_to_push [libs_to_push...]"
    exit 1
fi

exe=$1
exedir=$exe
libs=$@

# A directory at the device where binaries to be pushed.
remote_dest_dir=/cache/${exedir}

# A directory at local where binaries exist.
local_src_dir=app/src/main/libs/armeabi-v7a

adb wait-for-device
adb shell rm -rf ${remote_dest_dir}
adb shell mkdir ${remote_dest_dir}

# Push libraries.
for lib in ${libs}
do
    adb push ${local_src_dir}/${lib} ${remote_dest_dir}
done

# Push the executable then run.
adb push ${local_src_dir}/${exe} ${remote_dest_dir}
adb shell chmod 755 ${remote_dest_dir}/${exe}
adb shell "LD_LIBRARY_PATH=${remote_dest_dir} ${remote_dest_dir}/${exe}"
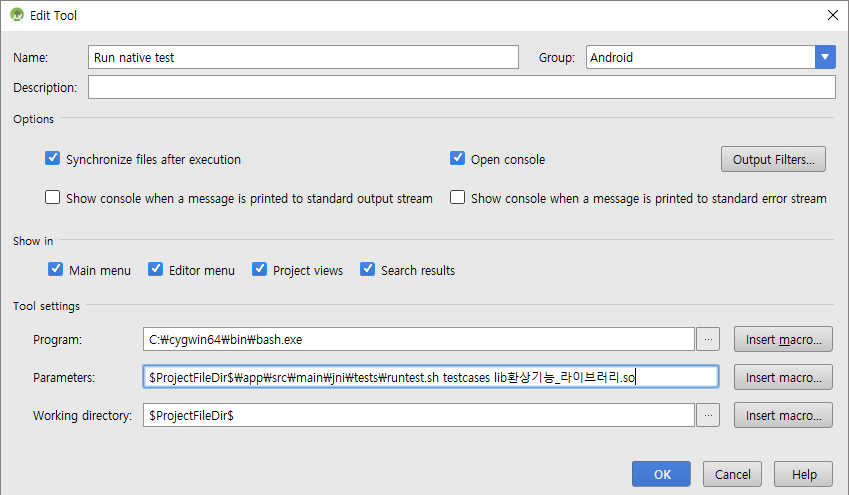
이제 Android Studio의 File -> Settings -> Tools -> External Tools 메뉴에 runtest.sh를 등록하자.

Program은 script를 수행 시켜줄 bash.exe의 위치를 지정해주고, Parameters로 실행할 script인 runtest.sh와 실행파일인 testcases 그리고 관련된 라이브러리 목록을 적어준다. 여기서는 lib라이브러_이름.so에만 의존한다고 가정했다.
그리고 마지막으로 Working directory는 project의 최상위 디렉토리를 의미하는 $ProjectFileDir$을 적어 준다.
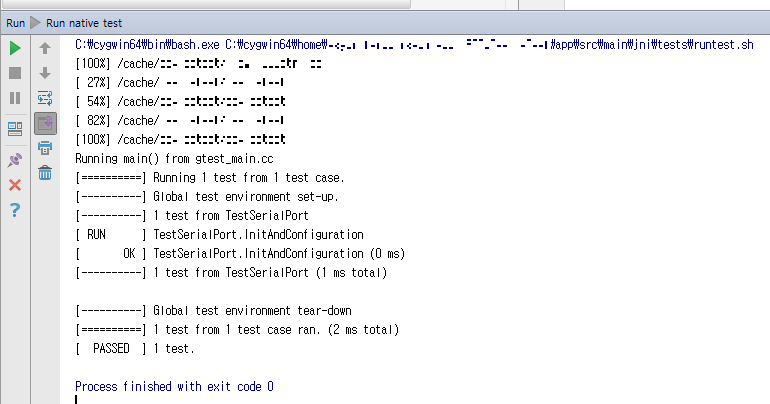
수행결과
지정한 단축키 혹은 위의 설정대로 라면 Tools -> Android -> Run native test를 실행시키면 다음과 같이 test case들이 실행되고 결과가 출력된다.
